리눅스보안
Certbot으로 무료 SSL 인증서 발급 및 설정하기
https443
2025. 8. 18. 19:26
CentOS7, Apache 기준
✅1. 패키지 설치
# 시스템 업데이트
sudo yum update -y

# EPEL 저장소 설치 (certbot이 EPEL에 있음)
sudo yum install epel-release -y

# certbot 및 Apache 플러그인 설치
sudo yum install certbot python3-certbot-apache -y

# *과거 yum install letsencrypt로 사용하였으며 현재도 certbot 설치 가능✅2. 인증서 생성
# 2-1. Apache 서비스 중지 (standalone 사용 시)
sudo systemctl stop httpd
# 2-2. 인증서 발급
sudo certbot certonly --standalone -d example.com

# 인증 방식 선택: standalone 모드 사용
# 생성 완료 후 인증서 위치:

/etc/letsencrypt/live/example.com/


# cert.pem : 서버 인증서
# privkey.pem : 개인 키
# fullchain.pem : 인증서 + 체인
# chain.pem : 체인만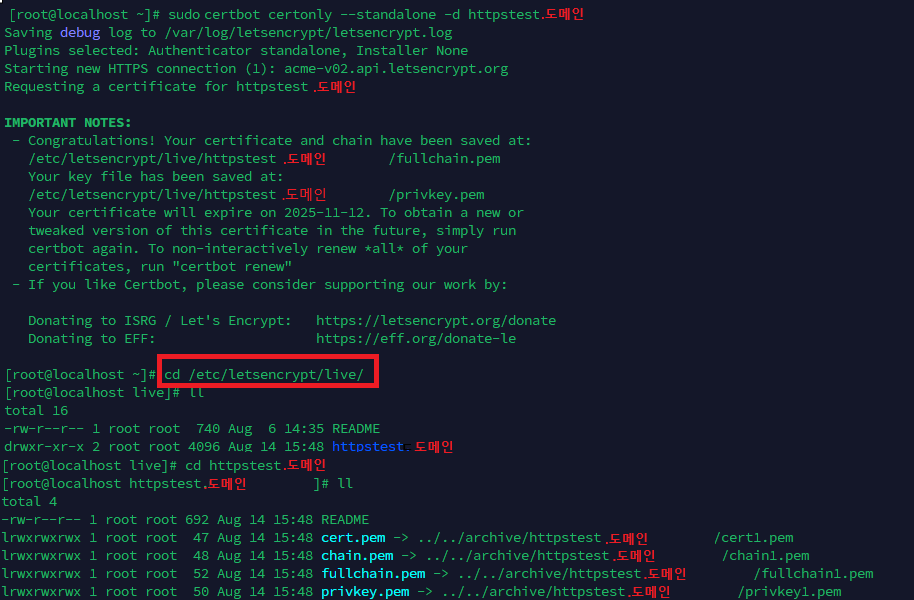
2-3. Apache 설정에 인증서 적용
# /etc/httpd/conf.d/example.com.conf 또는 사이트별 conf 파일에 다음 추가

<VirtualHost *:443>
DocumentRoot /경로
ServerName example.com
ServerAlias www.example.com
SSLEngine on
SSLCertificateFile /etc/letsencrypt/live/example.com/fullchain.pem
SSLCertificateKeyFile /etc/letsencrypt/live/example.com/privkey.pem

#로그 설정 추가

<Directory "/경로">
Options Indexes FollowSymLinks
Require all granted
AllowOverride All
</Directory>
</VirtualHost>✅3. Apache 재시작
sudo systemctl start httpd
sudo systemctl status httpd